Phase2 UI:
Instructions for RATCam
- The Basic Wizard Sequence
- Using the SequenceBuilder
- Mosaic & dithering
- Examples
The Basic Wizard Sequence
RATCam uses the generic "Multicolour Photometry" wizard and a single observation sequence is free to contain exposures using any or all of the imaging cameras. Generally it is more efficient to perform all observations required with one particular camera before switching to the next.
The wizard creates a sequence containing
- Slew to target. Only one target is allowed per group.
- Optionally engage the autoguider
- Optionally defocus the telescope. We recommend +ve values.
- A configurable sequence of science target observations using any of the imaging camneras.
The wizard dialogue screen offers the following options.
Rotator Setting
This sets how the image should be oriented on sky or how to align the mechanical rotator axis of the telescope. The two options are AUTOMATIC or MANUAL.
- AUTOMATIC orients the cassegrain derotator so the image will be aligned on one of the cardinal sky orientations N, E, S or W though you cannot control which one. It automatically chooses the field orientation best placed at the time of the observation in order to give the longest available observation duration without encountering the axis limits. Be sure to select RATCam from the instrument drop down list.
- MANUAL allows you to explicitly set the field orientation you want, either as a sky position angle or as the mechanical mount angle of the cassegrain derotator. At this point you simply set MANUAL. After creating your exposures, click "Continue" and the wizard will take you to the rotator specification screen.
In most cases we advise leaving this on automatic unless your sequence is longer than a couple of hours in duration. For detailed discussion, please read Cassegrain Rotator.
Autoguiding
There are options to disable guiding or to set to mandatory or optional. There are no RATCam specific considerations. See Sequence Builder for detailed discussion.
Defocus
The system automatically applies all offsets required to keep the instruments and filters in focus. Only explicitly apply DEFOCUS when you want your data to be defocused. We generally recommend using +ve DEFOCUS values. See Sequence Builder for detailed discussion. As an approximate rule of thumb from which to start, a V=8 star will saturate 2x2 binned RATCam in about 6sec with the telescope defocused by 0.5mm.
Please end your observation sequence with "Non-cumulative defocus = 0" so you leave the telescope in focus for the next observer.
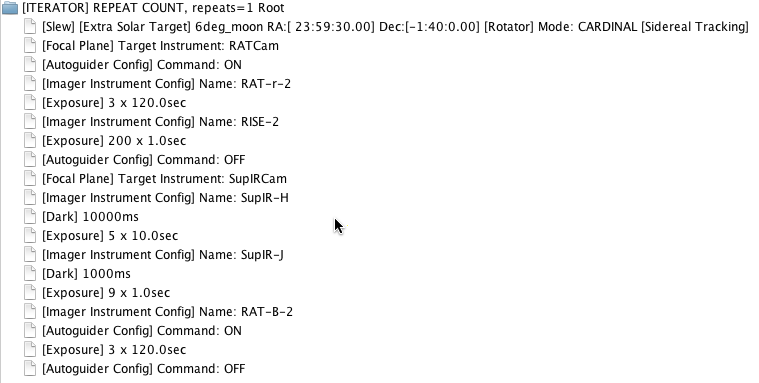
Presented below is an example of a group using all of RATCam, RISE and SupIRCam. A multi-instrument observation of a single target such as this may be created simply using the wizard.

Using the Sequence Builder
The common reasons you are likely to want to use the Sequence Builder in preference to the wizard is to obtain observations of multiple targets within a single group or if you need to combine imaging and spectroscopy in the same group. There may of course be any number of other much rarer reasons why you might elect to use the sequence editor. These could include a series of observations of a target at varying degrees of defocus or a series of different derotator mount angles. None of these requirements are common but illustrate the flexibility afforded by the sequence editor. See Sequence Builder for a general description of all the available functions and Sequence Builder Tutorial for an introduction to using the sequence editor.
The following points provide RATCam specific guidance when using the sequence editor:
Acquisition
Issue a SLEW command followed by FOCAL PLANE = RATCAM in order to place the target on the centre of the array. There is generally no need for any FINE TUNE command.
Rotator
There are no RATCam specific considerations. See Rotator on the Sequence Builder page or the more detailed Cassegrain Rotator instructions.
Autoguider
There are no RATCam specific considerations. See Autoguide on the Sequence Builder page for general autoguider instructions
Calibrators
There are no calibrators that are required to be taken at the time of your data. Though it is possible to include bias and dark frames in your sequence, these will not be used by the automated data reduction pipelines.
Expose
For RATCam this means a sequence of exposures all with exactly the same instrument and telescope configurations and integration time. I.e., you may subdivide long integrations into shorter exposures to allow for cosmic ray removal or to increase dynamic range. The current instrument configuration, whatever was last set, is used.
Though you do not need to precede every exposure with a configuration command, it is required that at least one instrument config command has been issued in the sequence before any exposures are made. This is required in order to identify which instrument is to be used.
Mosaic and dithering
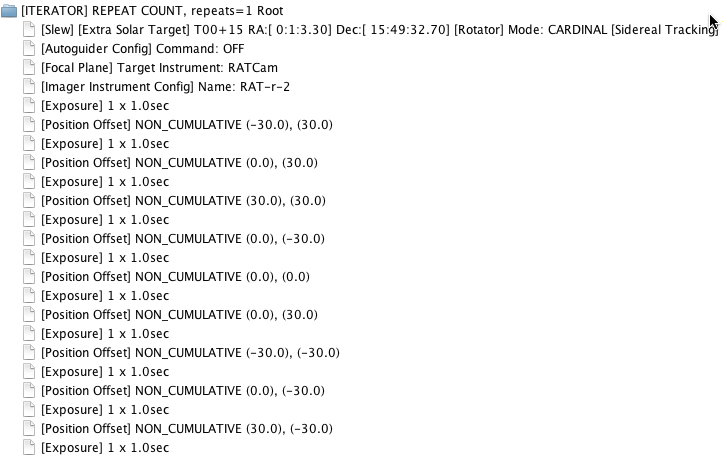
As with other advanced features, we recommend you first use the wizard to create and submit a sequence containing a simple, single exposure of your target. Then from within the general sequence editor you can use "Position Offset" to move the telescope and take further exposures.
- Non-cumulative offsets are with respect to the latest pointing target so successive offsets with the same values would all leave the telescope at the same position.
- Cumulative offsets are with respect to telescope's current position and successive offsets with the same values would walk the telescope off in a straight line.
The easiest method of building a mosaic is to use non-cumulative offsets, but if you are feeling adventurous it is also possible to use a combination of cumulative offsets and iterator loops.
The autoguider is not tolerant of telescope offsets and must be switched off before you apply your offset, otherwise the autoguider will compete with the offset instruction in an attempt to hold the field steady. If the individual exposures are short then it is better simply not to use the autoguider, but if you have a mosaic of long integrations the guider will need to be switched on and off for each frame. We strongly suggest using "On if available" rather than "Yes" since with the mandatory "Yes" setting the entire group will fail and be abandoned if any single position of your mosaic fails to lock the autoguider.
Examples
Example 1:
Simple RATCam mosaic using non-cumulative offsets. Autoguider disabled because integrations are short.

Example 2:
Simple RATCam mosaic using cumulative offsets and an iterator loop. Autoguider enabled and disabled for each integration. This is expensive in overheads, but clearly necessary for such long integrations. Use "On if available" for the autoguider.


